Hardscrabble šŸ«

By Maxwell Jacobson

See also: the archives and an RSS feed

git repl

November 30, 2014

The other day I mentioned coming upon a neat set of git extensions called ā€˜git extras’ by TJ Holowaychuk. Since then I’ve become slightly obsessed with it. It’s so useful, including as a terrific learning tool. Take ā€˜git repl’ as an example.

First of all, what is it?

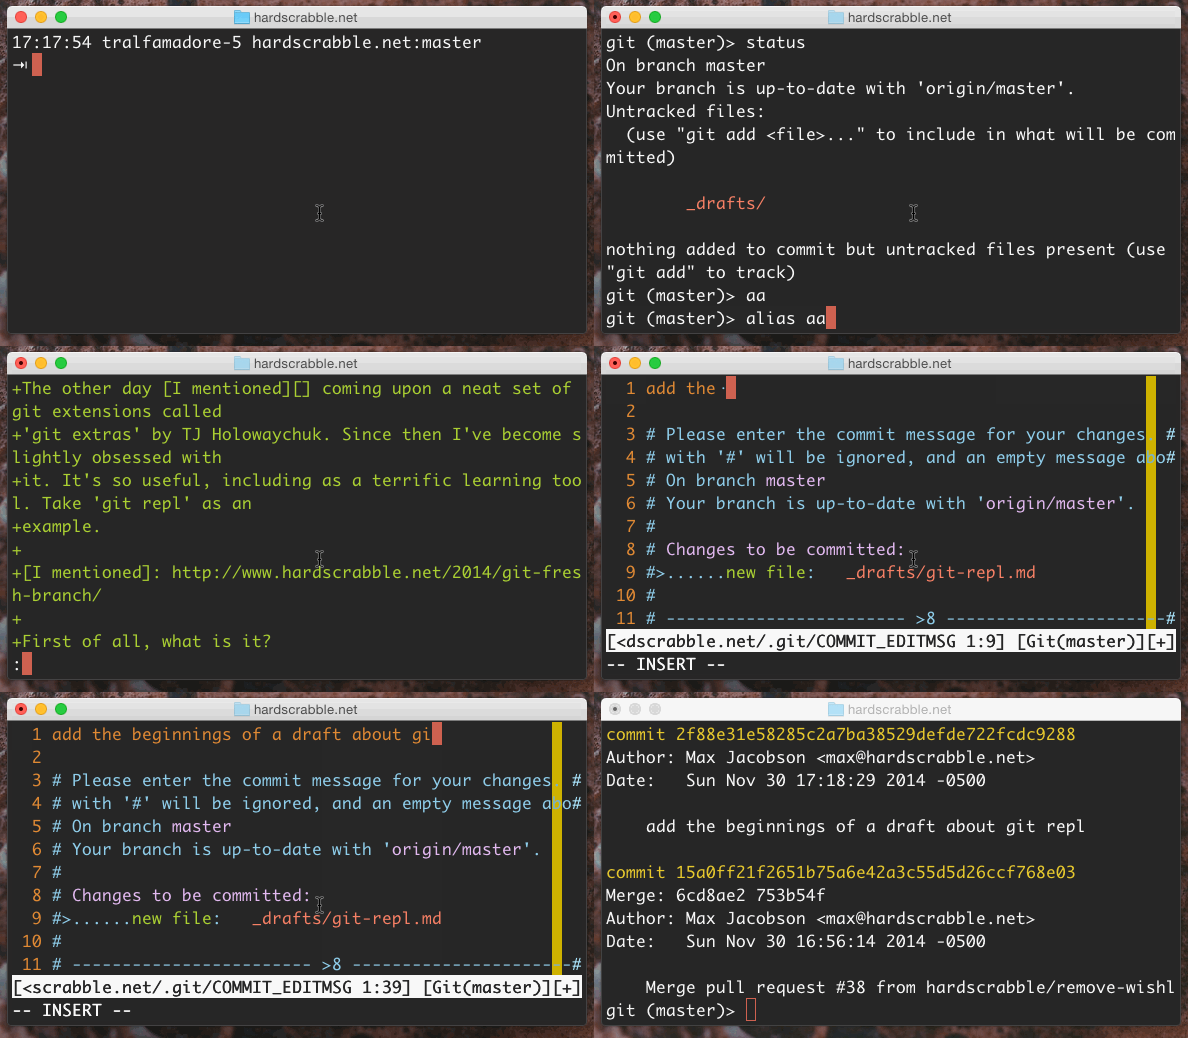
allow me to answer with a GIF:

vim auto indent gif

In short: if you’re gonna be doing a bunch of git operations in a row, why keep typing git over and over when you can go into a git repl and just let it assume that everything you’re doing is going to be a git command?

It plays well with vim, too – the commit message editor seamlessly pops into vim and then back into the git repl on quit.

So how does it work? I looked at it and assumed that it must be so much code and way beyond my understanding. But that’s totally wrong! It’s just 43 lines of bash and it’s fairly readable.

The really interesting part is read, which has a comment indicating that it’s powered by Readline, which is one of those words that I’ve seen fly around while existing in the world of software, but have never heard defined. Well, here’s the wikipedia page for it: GNU Readline. It was originally written by Brian Fox, who also created bash. Ruby’s various REPLs (eg rails console, irb, pry) are probably using it under the hood via Ruby’s standard Readline library, which makes writing a REPL super simple, while maintaining the behaviors you may be used to. For example, I compulsively press control+l to clear the screen; this works in a readline REPL but not in something like this:

loop do
  print "> "
  input = gets.chomp
  puts input
end

Filename tab completion works as well! Whoa!

Here’s my first readline program, inspired by the git repl code:

function extensions {
  read -e -r -p "find files with extension: " extension
  find . -name "*.$extension"
}

Try pasting that into your terminal then entering extensions to run it and to explore your projects. It should prompt you for a file extension (try entering rb in a Ruby project, for example) and then spit out the list of files with that extension in the current directory (and its subdirectories).

Not a particularly great program! I’m mostly just happy to see how simple and demonstrative the git extras code was.

idempotent

November 29, 2014

HTTP GET requests are supposed to be idempotent, but they often have the side effect of appending some request details to a log file, which can eventually grow so large that it fills the disk and takes down the server.

git fresh branch

November 28, 2014

Tonight while clicking around the web I discovered tj/git-extras, a set of useful git tools maintained by TJ Holowaychuk1. Once installed, your git command is overloaded with a bunch of new, useful commands.

It’s easy to install, but it does add quite a lot of stuff, and I was worried for a moment that it would clobber some existing aliases of my own. One, git squash, comes dangerously close to my beloved git squasher, but doesn’t actually conflict.

If you are worried about it, you can safely pick and choose which extras you want by saving individual scripts and just making sure they’re all on your PATH and executable.

The readme explains their purposes nicely, but I want to emphasize one in particular: git fresh-branch <branch name> which does stuff I didn’t know was possible.

Let’s say you’re maintaining an open source library that has existed long enough to accumulate many commits and files. Let’s say you want to create a github page for that library to explain what it’s all about and how to use it. The way github pages works, you should create a new branch in the same repo with the branch name gh-pages, and on that branch you keep a set of assets that will become a static website. But when you create a new branch, it will have all of the code from your open source library, and an entire history of commmits. I can imagine doing something like this:

# create a new branch
git checkout -b gh-pages
# delete all of the existing files
git ls-files | xargs rm
# stage those deletes
git add -A
# commit the change
git commit -m 'BURN IT DOWN'

# create the first version of the site
echo 'hello! use my gem!' > index.html
git add index.html
git commit -m 'gh-pages init'
git push origin gh-pages

And then I’d wait for GitHub to do its magic and expect to see my great page online in a few minutes.

It’s kind of awkward having a ā€˜BURN IT DOWN’ commit, but I didn’t know there was an alternative. With git extras, that could look more like this:

# create a new branch WITH NO HISTORY AT ALL
# NOT ONE COMMIT
git fresh-branch gh-pages

# create the first version of the site
echo 'hello! use my gem!' > index.html
git add index.html
git commit -m 'gh-pages init'
git push origin gh-pages

How the heck does it work? We can look at the fresh-branch script online, but I’ll include the latest version here for reference:

#!/bin/sh

branch=$1

test -z $branch && echo "branch required." 1>&2 && exit 1

git symbolic-ref HEAD refs/heads/$branch
rm .git/index
git clean -fdx

I guess a lot of the work is being done by symbolic-ref.

While researching this post, I noticed that git-extras also offers a gh-pages script that is even more tailored to the use case from my example. Of course! šŸƒ


edit: I probably should have slept on this post and actually explored more how it’s working under the hood. But I did not.

  1. Formerly ā€˜visionmedia’ on GitHubĀ 

ruby-build, chruby, and yosemite

October 19, 2014

A few months ago I stopped using rvm to install and manage my ruby installations on my computers. I don’t have a great reason, other than reading that Steve Klabnik uses something else and I felt like trying it one day.

What I use now:

ruby-build

This is how I install rubies:

  • brew install ruby-build – get ruby-build
  • mkdir ~/.rubies – this is where rubies and gems will go
  • ruby-build --definitions – shows you a list of all the available rubies. When new ones come out, you should be able to just brew update and brew upgrade ruby-build to get access to those new definitions
  • ruby-build 2.1.3 ~/.rubies/2.1.3 – first argument is the name of the definition from the previous step, and the second argument is where to install all the code
  • watch it install

chruby

This is how I switch between versions of ruby.

setup

The instructions in the readme are good. The gist is that you install a script and then source it from your ~/.bashrc so it will be included in your shell sessions. This exposes a chruby bash function, which you can thereafter reference from the shell to switch between rubies (eg chruby 2.1.2) or even later in your ~/.bashrc, to choose a ruby immediately upon starting a shell session. This will look in the ~/.rubies folder by default, which is why I install my rubies there.

Yosemite…

So this all stopped working on my laptop yesterday when I upgraded to Mac OS X 10.10 (Yosemite). I couldn’t run bundle install without getting a nasty error, and I became convinced that I needed to rebuild all of my rubies. So I thought ā€œOK, I know how to do thatā€ and ran rm -rf ~/.rubies and set about following those steps under ā€œruby-buildā€ above.

It didn’t work, so I went to sleep.

Long story short, this fix worked: https://github.com/sstephenson/rbenv/issues/610#issuecomment-58804829

Where before you would have run ruby-build 2.1.3 ~/.rubies/2.1.3, now (until ruby-build makes a fix) you can run CC=clang ruby-build 2.1.3 ~/.rubies/2.1.3.

I don’t know if rvm had this problem. I wouldn’t be surprised if they did, and it was fixed quickly. But like. It’s kind of cool to use smaller tools sometimes.

the cop and the hound

September 28, 2014

As a rails developer I keep hearing about Thoughtbot’s cool projects. A fairly recent one is Hound, a tool that comments on your GitHub pull requests and points out code style violations. I think consistent style is a nice ideal to strive for, so I want something like this.

Setting up Hound is easy, but it only reviews the code that is added in a pull request, not the existing code base. Which, in theory, is fine. Except, if you’re the kind of obsessive compulsive who wants a style guide, it’s probably not.

So I managed to make Hound review the full code base but it took some tricky git branching and pull requesting. So I made a screeny1 to share:

I didn’t want this video to be too long, so I stopped when I managed to get the full codebase analyzed. But here’s my plan to continue:

  1. I’ll need to learn how to configure Hound to more accurately reflect my tastes. Under the hood it uses rubocop, pre-configured with Thoughtbot’s style rules. I’ll add my own configuration and push again, which will hopefully refresh the comments.
  2. Then I’ll fix all the code style violations and keep pushing them up until all of the comments go away. Then I’ll merge the second pull request. At that point my first pull request will (hopefully) have a diff that shows exactly what I want: new configuration and style fixes.
  3. I’ll squash that branch to have just one commit and merge it.
  4. Then I’ll merge that pull request into master and be nicely set up for a future of consistent style.

1. configuring rubocop

These are the default ā€œcopsā€ for rubocop. If I were starting fresh with rubocop (and not using Hound), I would start with this configuration file and start disabling specific cops. In fact, this is exactly what Hound does. Their tweaks are available because Hound is open source.

Here’s what I came up with: https://github.com/maxjacobson/film_snob/blob/hound-it-up/.rubocop.yml (if that link is dead, it’s probably because I merged the PR and deleted the branch, in which case the file can be access here).

Maybe I’ll change it over time but it seems good right now.

2. fixing all the violations

Done: https://github.com/maxjacobson/film_snob/pull/46

Being consistent feels good šŸ™‚.

It’s actually not that hard to use rubocop directly without Hound. I also added rubocop to my Travis CI configuration, so even if I didn’t have Hound, pull requests would consider style guide violations, because the build would fail. There’s no commenting, which decreases the visibility. But it’s OK because Hound double-comments if you push the same problem twice, so maybe the comments aren’t that great? It’s also much more strict. If you have an 81 character line, it’s a complete no go, the build fails, you can’t merge that.

I’ll try that.

  1. I call them screenies because the app I use to make screenies is called ScreenyĀ 

sleep timers

September 7, 2014

Falling asleep is one of the weirdest things that everyone does every day. Many people struggle to do it all. They experiment and develop workflows that help cope with this necessary evil. Here’s mine.

If I’m very exhausted I simply lie down, close my eyes, and shortly thereafter I fall asleep. This isn’t very often due to my sedentary lifestyle, so I’m often lying in bed wondering what I’m supposed to be doing with my arms and/or mind. The recourse I usually take to is to play a podcast. Many would argue that listening to a podcast is counter-productive to the goal of falling asleep. I don’t completely disagree, but I like to do something to fill that time, even if doing nothing would mean less time falling asleep, podcasts make the longer time pass quicker, so it evens out.

One problem is that podcast clients often autoplay, such that when one episode ends, the next begins. If you combine this feature with the auto-download feature, this creates the risk that I will go into an infinite loop of listening to podcasts literally forever.

If I could somehow fall asleep while people were talking, I would wake up to hear them still talking, potentially about anything at all, which I imagine to be extremely disorienting.

To mitigate these risks, I’ll apply a sleep timer, which means that I’ll tell the podcast to stop playing after a specified number of minutes has passed. Here are the steps I take:

  1. I press play on a podcast
  2. I apply a sleep timer of 5-15 minutes depending on how sleepy I feel
  3. I listen to the podcast while relaxing my body and mind
  4. I sense the impending timer running out and a curious tension fills me
  5. The podcast fades out and stops and I immediately fall asleep

If I don’t fall asleep, I start over, maybe with a shorter timer. I never fall asleep before the sleep timer runs out. If I do that, I’ll miss part of the podcast, which I would hate.

It’s essential to my bedtime workflow that I have fine control over how many minutes the sleep timer will run, because I believe that I can predict how long it will take me to fall asleep based on my current level of sleepiness. It’s also important that the audio fades away because that signals my internal systems to prepare to do that last, most important step (falling asleep).

This is my main complaint about the otherwise terrific new podcast app Overcast which does offer a sleep timer, but one that can only be set in crude chunks of 5 minute increments, and which stops with no fade out at all. I won’t be switching back to Downcast, which set the standard for sleep timers for me, but I suspect my sleep will suffer.

How do you fall asleep?

vim will fix indentation mistakes

September 7, 2014

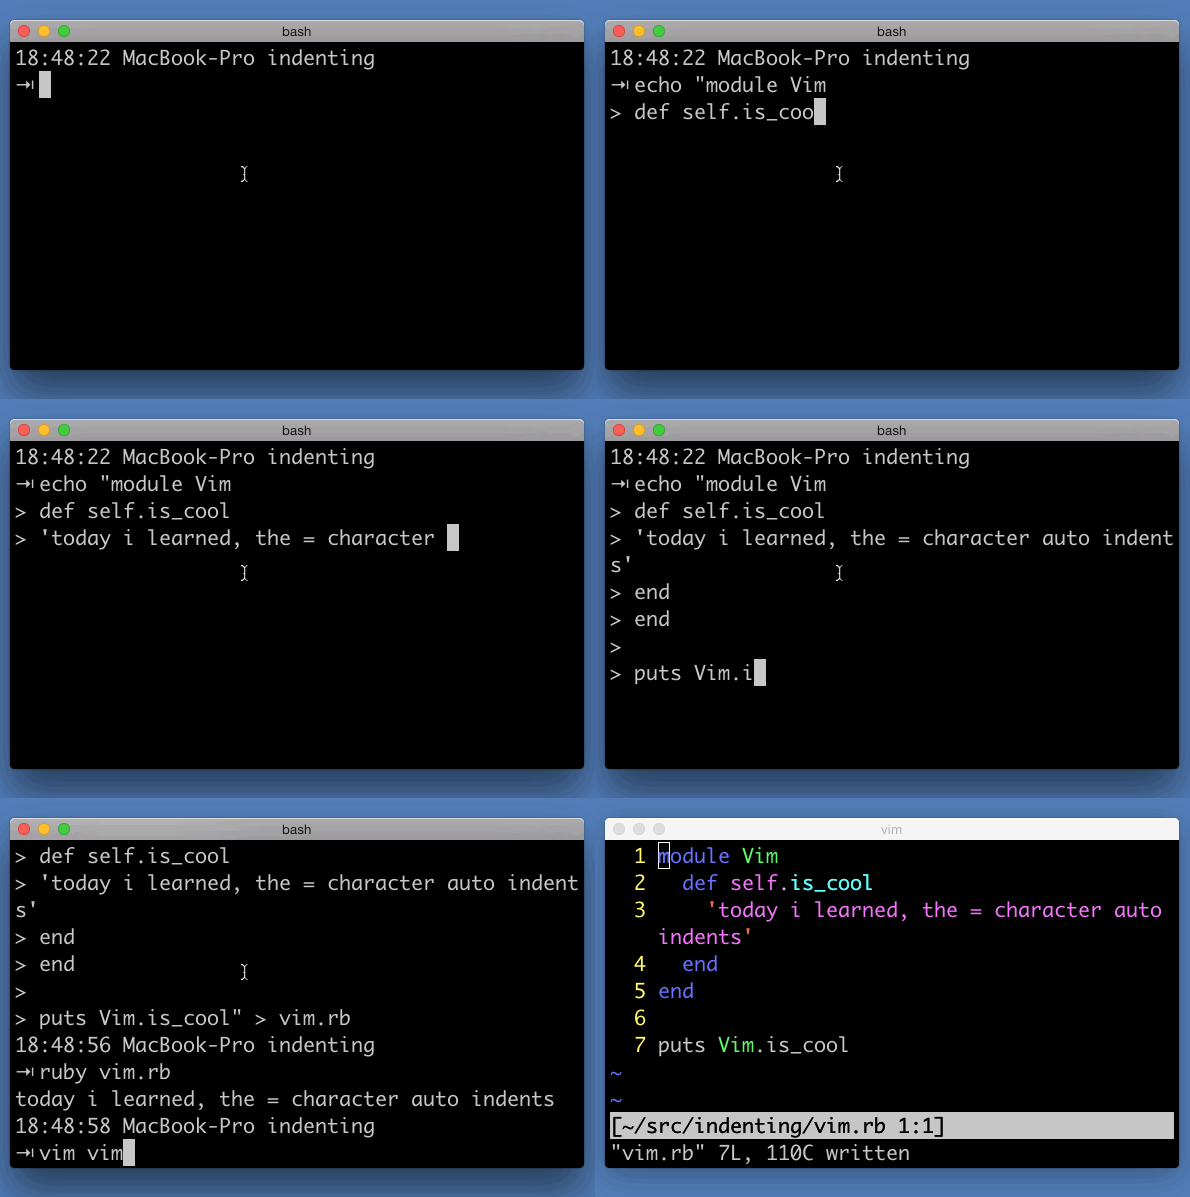
Today I learned a neat vim trick (via the Aaron Paterson Play by Play interview):

vim auto indent gif

You can highlight some lines with visual mode and then press = and it will fix all of the indentation mistakes therein. If you’re in normal mode, you can press == to fix just the line you’re currently on.

Paterson cites this trick as an argument in favor of not indenting private methods an extra level, because vim doesn’t do that. For example:

# do this:
class Dog
  def bark
    barks.sample
  end

  private

  def barks
    ["woof", "yap", "ruff"]
  end
end

# NOT this:

class Cat
  def meow
    meows.sample
  end

  private

    def meows
      ["meow", "purr", "idk what else, cats are weird"]
    end
end

I generally do that extra indent but I might stop now šŸƒ.

jekyll 2

September 6, 2014

I just finished updating my blog to Jekyll 2.0. It looks the same, but the code is nicer.1

The marquee feature is that Jekyll now knows how to compile Sass and CoffeeScript. I was already using those languages, but relying on a complex Guardfile to accomplish it. I’m pleased to delete that.

Like all files Jekyll processes, Sass and CoffeeScript files must have YAML at the top of them, though no YAML data is actually required to be there, just the hyphens where the YAML would go. That’s an awkward requirement which I hope goes away.

The other thing I got to delete was some boilerplate configuration in the head of every page and post, in which I would tell Jekyll that posts should use the post layout and pages should use the page layout, so it knows which layout to use. Now I just tell it which layout to use for posts and which to use for pages once in the global configuration file, which is much nicer.

The last new thing I want to explore is using GitHub-style code blocks. I’d prefer to use the triple backtick over the liquid tag. This is supposed to be possible but I couldn’t get it to work perfectly – code blocks were generated, but lost the syntax highlighting so I decided to leave it for now.

The creator of Jekyll, GitHub co-founder Tom Preston-Werner, recently left GitHub after being investigated about very unprofessional behavior. Four months earlier, the Jekyll project was distanced from him a bit when the source code was moved from his personal account to an organization account dedicated to Jekyll and related projects. This is normal and reflects that the project outgrew him, and that he’s not the main maintainer anymore. When Jekyll 2.0.0 was released, Preston-Werner’s name was buried in a wall of thank-yous.

I feel slightly weird using Jekyll because of who created it. I’m glad it doesn’t follow the naming pattern of toml and tomdoc at least.

  1. The diff says I deleted 3623 lines, but it’s not as amazing as that sounds because 3263 of them are from a CSS library that I realized I don’t use anymore.Ā 

when your disk fills up, who are you?

September 6, 2014

I got into technology in large part because I was drawn to the Mac community. I started reading blogs about apps and productivity. That occupied a lot of my mind during college in particular, when I was struggling with procrastination and wanted to find some silver bullet app to save me.

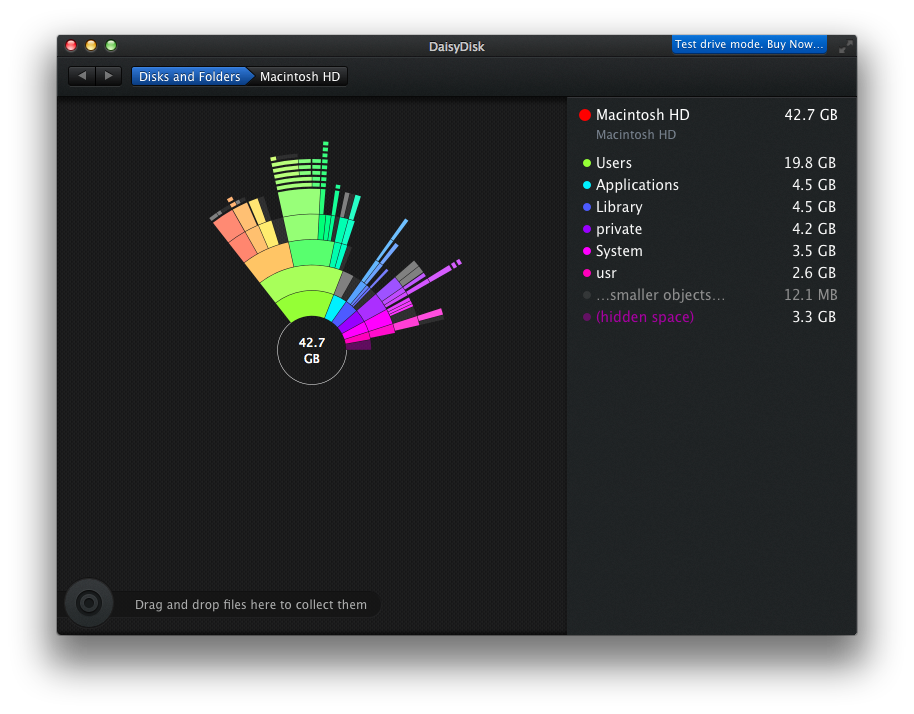
During that time I heard of a neat app called DaisyDisk which analyzes your Mac’s disk and breaks down exactly where your data is on your computer. It can help you remember about huge files you totally can delete or games you don’t play anymore and can easily re-download if you want to again. I had a 2006 MacBook with an 80 GB hard drive (the cool black one) that I needed to constantly bail files out of. DaisyDisk’s colorful, powerful interface was a life saver and, for me, a benchmark for how cool an app could be.

It was updated fairly recently and seems to still be great. I just re-downloaded and ran it on my 128 GB MacBook Air:

my daisydisk results

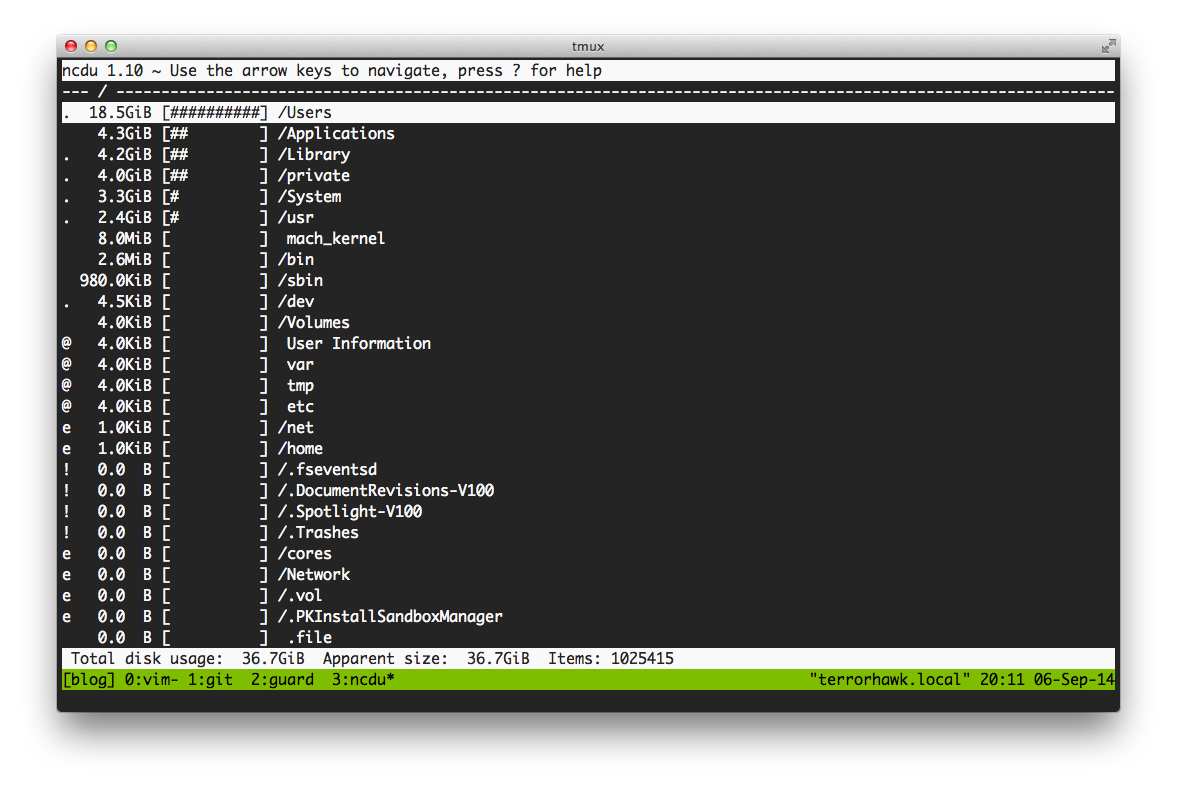
Fast-forward to a few months ago, and I’m at work as a web developer and my coworker comments that the disk on one of our production Linux servers is nearly full, and we need to find something to delete. I knew DaisyDisk wouldn’t work in the command line but didn’t know what to suggest. He remembered something called ncdu and ran it and I had immediate, rippling acid flashbacks to DaisyDisk! ncdu is a tool that runs totally in the command line with a nice interface and accomplishes the same goals and supports the same workflow:

  1. start the app
  2. wait while it analyzes your disk
  3. see your top-level directories sorted by how much disk space they use
  4. let you drill down and see the same for all sub-directories
  5. let you delete culpable files right from its interface

Here’s what it looks like:

my ncdu results

Kind of the same!!

It would have been hopelessly intimidating and weird to me a few years ago but for the me that I am today (someone who sometimes uses Linux) I can’t help but find it much cooler.

ncdu can be installed on a Mac via homebrew with brew install ncdu or on Linux with sudo apt-get install ncdu.

my newest git alias is git

September 6, 2014

Adding aliases makes git a lot more pleasant to use. For example, I am too busy to write git status to find out the current status of my project so I did this:

git config --global alias.st status

and now I just write git st.1

I have a few other git aliases that I find helpful. They’re on my dotfiles repo here: https://github.com/maxjacobson/dotfiles/blob/master/.gitconfig

I want to share my newest one because it’s kind of weird and fun. It solves a problem that others might have, but I apparently totally do: I often write git , don’t hit enter, and then go do something else. Then I come back and I write git st and hit enter, and I see this output:

⇄ git git st
git: 'git' is not a git command. See 'git --help'.

Did you mean one of these?
        hist
        init

I see this probably every day.2

I wanted a new alias that just kind of ignores the extraneous git. Most git aliases don’t behave that way. At first I tried aliasing git to nothing at all, but it didn’t let me. I landed on this:

git config --global alias.git "! git"

The exclamation mark character means this alias doesn’t refer to another git command; instead, I want to run an arbitrary bash command… which, in this case, happens to be git itself. Luckily, the git aliasing system doesn’t simply run the quoted bash command, but it passes the rest of the arguments along, so git git st now behaves the same as git st, not simply git.

I’m pretty happy with this. I have a nagging worry that it’s too weird to not have some unwanted side effects, and if I discover any I’ll update this post.

  1. btw: when you do that, it gets saved in a dotfile in your home directory called ~/.gitconfig. If you open that file you’ll see your name and email address too if you set that up (if not, check out GitHub’s page on that)Ā 

  2. you might see different output, but hist is another of my aliases and it’s close enough to git that git thinks I meant it.Ā