I’m writing this on a sticker-covered MacBook Pro my Grandma bought me 3.5 years
ago. It’s a pretty powerful Mac. I thought I wanted to be a freelance video
editor then. I bought the controversial Final Draft X around that time too.
I haven’t edited more than few personal videos, but I’ve used this to write a
lot of code and I think I’ve benefited from it having a powerful
processor
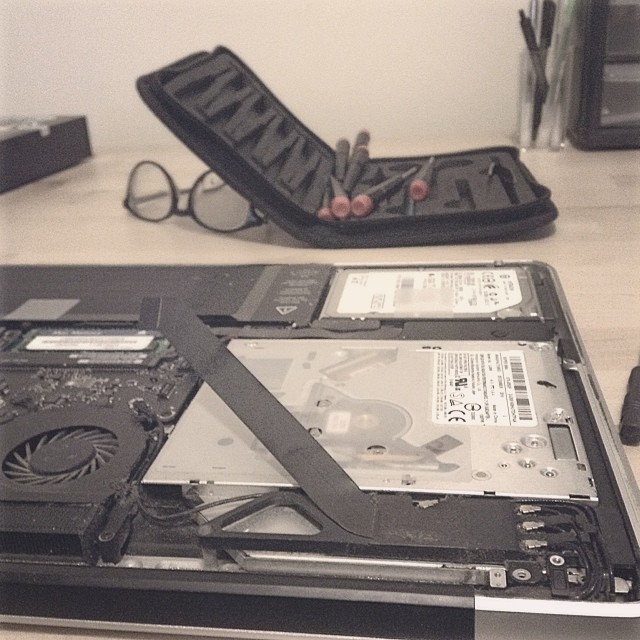
I don’t really know anything about hardware, but I’ve nonetheless made a few
hardware upgrades over the years. Less than a year after getting the computer, I
upgraded the RAM from 4 to 8 GB:
(Photo via my my instagram from January 1, 2012)
That was pretty easy. You just have to unscrew the bottom off, pull out the old
RAM, and add the new RAM (which you bought from Amazon or Newegg or something)
and then screw the back on again. It uses normal little phillips head screws.
That worked out for a few years. Then it starts feeling slow again. I’ve come to
understand that SSDs are faster than HDDs and decide to remove the optical drive
in my laptop, move the HDD into that position, and add a new SSD in the position
of the original HDD, and then use the SSD as my primary drive.
I order the parts from the internet and buy a screwdrive set from TekServe and
feel very confident. Ultimately I was too confident. This was a super advanced
thing to do! I almost ruined my computer.
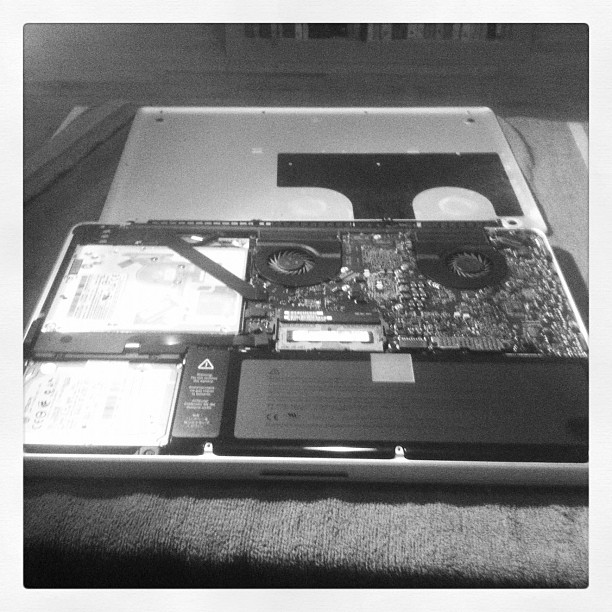
(Photo via my my instagram from June 6, 2014)
Basically: stripped screws are the bane of my hardware existence. What do you do
when you need to remove a screw so you can remove an optical drive, but the
screwdrive spins and the screw stays put? What the hell do you do?
On some level I believe there’s a solution to every problem. Sometimes the
solution is more dramatic. When I can’t remove a screw from some fixture, I do
the next best thing and destroy the fixture. In that picture you can see the
optical drive on the right, and a plastic-looking arm holdig it in place. It
turns out there’s metal underneath the plastic.
Fast forward to tonight and I have forgotten how bad I am at this stuff and I
have a new mac upgrade mission. I’ve been getting little warnings in the status
bar that my battery needs attention. I’m worried the Apple Store won’t service
it because of the previous modifications I made, but I find a straightforward
replacement instruction set online that makes it seem pretty doable,
and I order a replacement battery from Amazon that is half the price of
the one Apple sells and I’m preparing to open it up again.
Honestly, I should have heeded the first signal, which was that one of the
screws holding the bottom plate in place was slightly stripped and didn’t want
to come out easily. I stayed patient and tried a few different screw drivers and
ultimately managed to slip it out. I’m feeling pretty good. The bottom plate
comes off.
The battery has a sticker on it warning not to try to replace it yourself. I
ignore the sticker. The instructions online tell me there are only three screws
to remove, but they’re not a typical kind of screw. Luckily, the battery came
with a special screwdriver for this purpose. The first two screws come off
easily. The third is hidden under the sticker. I have never even lifted this
sticker in my life, I swear, but somehow this last screw is pretty stripped, and
there’s nothing for me to do. I either have to give up or resort to drastic
action. There’s no coaxing this one out.
So what do I do? I find the power drill my dad left at my apartment a few months
ago and start fucking up this fixture:
(Video via my instagram from December 12, 2014)
I try prodding and poking and sawing at it with a drill, a pocket knife, with
various screw drivers, for well over an hour. I learn more about how the power
drill works when suddenly its mouth opens and the drillbit falls out and I have
to figure out why.
Something like an hour and a half later the fixture is sufficiently destroyed
that I can remove the battery. I’m pretty nervous that I’ve more or less
destroyed the entire computer. I figure there’s a good enough chance that the
drill would poke through the machine and screen, or I sever the strip that
connects the SSD drive to the computer or who even knows?
Because I never really removed the old screw, I just forcefully ripped the old
battery from it, the new battery doesn’t really fit. It has a little ear that
wants to be fastened down in that same place, but that place is occupied by an
old screw fastening nothing. So I ply away the ear, and position the battery
fastened by only two screws.
I hold my breath and turn it on. It actually kind of works. The warning light is
gone. The “battery health” is 101% now, whatever that means. The estimated
duration is still terrible, less than an hour on a brand new battery, but I
kind of don’t care. Actually that number is going up as I type this 🎸.
I feel like I need to wear a promise ring not to ever try and open up this
computer again, for my sake and its. It just won’t be a happy thing to do. I
hope writing this makes me remember that.
Although, now the HDD isn’t showing up in the list of drives… maybe I should
just open it one more time and take a look…